How To Make Scout Flies
- Krista Lindner
- Sep 15, 2018
- 4 min read
In this tutorial you will find how to make a scout fly cage as well as printable stencils. The stencils were measured and drawn out by me. So if there's anything weird when you go to make yours feel free to shoot me a message and I can help you out the best I can!
So let's begin!

Here's what you'll need:
- Exacto
- Extra exacto blades
- Dremel or sand paper
- Heat gun
- Ruler
- Sharpie
- Contact cement
- Fairy lights
- Empty travel shampoo bottle
- Velco circles
- Two sheets of 5mm foam
- One of 2mm foam
- Stencils
- Mod podge
- Black plasti dip
- Paint of various colors
Links:
Stencil:
Fairy Lights-
Shampoo travel bottle-
Velco circles-

Step 1:
Let's start with cutting out your pieces. The only thing that will be transferred to the 2mm foam is the "light bugs" which is the large rectangular box with all the holes in it. Everything else will be traced and cut out on 5mm foam. Everything will be cut out except Circle 3, that will be used as a tracer later on.
TIP: Make sure you're changing out your blades regularly for clean smooth edges.
Step 2:
We'll start with the base of the cage. On both of your Circle 1 pieces, cut about a 1 inch circle in the middle of each. This doesn't have to be perfect. Just big enough to be able to stick the fairy lights through later.

Glue the long .11 inch thick strip to one of the Circle 1's. Once attached, glue the other circle one on top to make a cap. (Picture shown to right)
Mine came out really rough because I'm not good at cutting out perfectly circled foam pieces so I took a dremel with a sanding bit to mine to smooth out the edges.
TIP: If you don't have a dremel, no worries a normal piece of sand paper would work well too!
Using the Circle 1 stencil, mark the 8 marks all the way around the top of the base. (Refer to Step 6 picture for reference) You will need this later.

Step 3:
Take your Circle 3 stencil and place it on top of your Circle 2 piece in the center. Trace and cut out the hole. Repeat this one more time on the Circle 2's. Using your shampoo bottle, trace the top with the lid off in the center of one of the Circle 2's. This is so your bottle stands up right on the base. (Picture shown to the left) You Should have one left over Circle 2. Keep one of the pieces with the hole that was cut out from the Circle 3 stencil and the one without to the side for now. These will be used later for the cap.
Glue the .5 in thin strip to the Circle 2's with the holes cut into them. (Sand edges if needed) Glue this to your main base you made from the Circle 1's. Try to center them as best you can. This will make it easy to feed the fairy lights through later.
Step 4:
Now for the cap. Glue the second .5 inch strip to the remaining two Circle 2 pieces. One should have a hole and the other should not. (Sand edges if needed)
Step 5:
The scout flies are essentially that thin 2mm foam rectangle with the circles cut out of it. Measure it around your shampoo bottle, I've noticed that they sometimes get shipped in different sizes so make sure you measure it out, if you need to add more just repeat the stencil on the foam and cut where it needs to end.
Before attaching it to the bottle, apply a three thin layers of mod podge, making sure it completely dries before adding the next layer. Once it's dried, spray light coats of plasti dip on it. You can use black paint however it might start to crack when you glue it to the shampoo bottle. Plasti dip is like flexible spray paint.
Once your piece is good and dry glue it to the bottle and then glue the bottle to the base of the cage.

Step 6:
Now to mark the bars of the cage. When I did this I realized I should have built the cage and glued it together first before attaching it to the base. So in the pictures, you'll see it together, but I suggest attaching it last.
Using the hook pieces use the stencil to mark the lines for each 5 markings. (Picture shown below.)
Step 7:
Let's begin with the cage construction. Glue two pieces together at the top where the hook curves. Glue two more pieces on either end. Angle cut the remaining four pieces to fit in between each open area.
Now take the small 1.2in slightly curved pieces and glue them between all the notch lines that we drew earlier. Five in between each bar. Till you start to have your cage.

Step 8:
Once your cage is created before we attach it to the base, you'll want to mod podge and plasti dip it. If you don't plasti dip it, no worries, black paint will work fine as the primer. But definitely mod podge it. After that I recommend painting it before attaching it to the base. But don't paint the bottom pieces that'll attach to the foam base later.
Step 9:
Back to the main base, mod podge it about three to four thin coats. Make sure to let it dry completely again through each coat. Paint the inner raised base part, where the bottle comes out of. I usually do a black coat first then my color.
Step 10:
Glue the cage to the base. Line up each little notch that was drawn into the base back on step two. I recommend gluing each bar down one at a time to make sure everything lines up well.
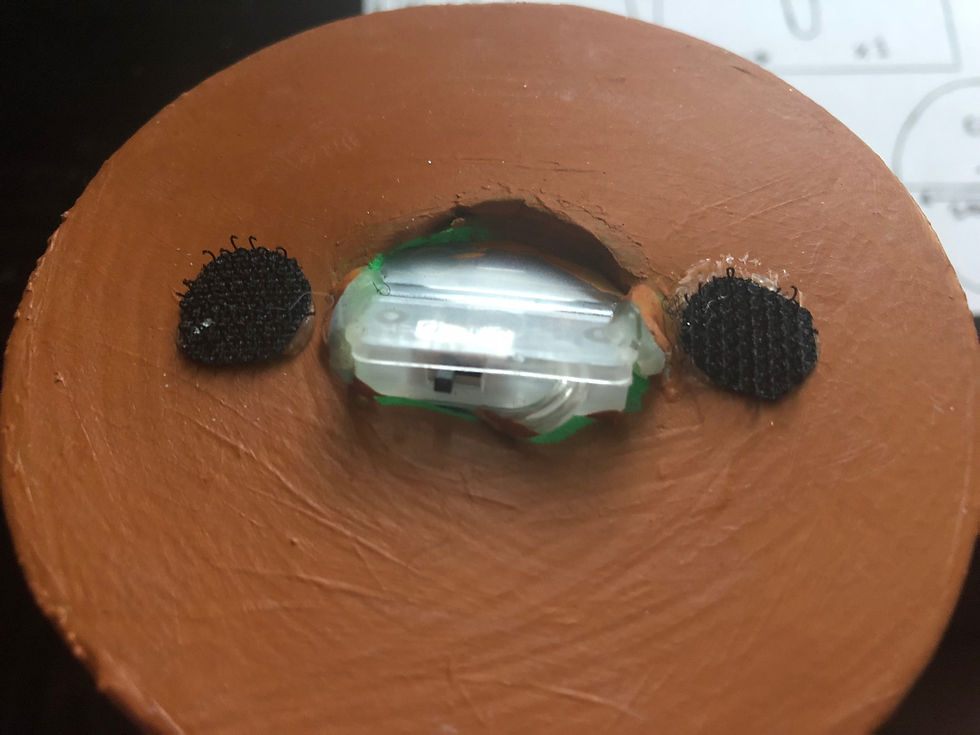
Step 11:
Glue two velco taps the top of the base as well as two more on the cap. Feed the fairy lights through the bottle and glue the light switch at the top of the hole for easy access. The cap will cover this part.
Step 12:
Paint the remaining pieces to the colors of your choosing.
And WA-LA! You have a scout fly cage. I have it velcored attached to my belt to stay in place and for easy packing purposes. But you can create all different kinds of wayto connect it to your cosplay depending on what Monster Hunter you're cosplay as.


Comments